BEAUTY: L'OCCITANE, PIVOINE SUBLIME RANGE

Left: CC Skin Tone Correcting Cream in Light, Right: Tinted Lip Balm in Rose Plum
It's that time of year where we all head out to buy our Spring/Summer make up and skincare. I was delighted to find the new range from L'OCCITANE in my local store - no wonder I left with several products! I'm always so impressed with the service and assistance by L'OCCITANE colleagues so if you have one near you, give them a visit. I tried both these products in store and instantly fell in love, after using them religiously for several weeks now, I haven't lost this initial obsession.
Swatch: Tinted Lip Balm in Rose Plum
Tinted Lip Balm in Rose Balm: I was initially attracted to this lovely product because of it's combination of colour perfection for Spring/Summer and an SPF of 25 - perfect for fair ladies like myself. I almost allowed myself to purchase several out of the 4 colours this balm comes in (Rose Plum, Rose Amber, Rose Nude and Transparent). I must order the transparent balm for super soft lips all Summer. These balms remind me a lot of Benefit's balms but I feel these out do their rivals in the category of 'looking amazing whilst doing an equally amazing job', not only do the colours look great but the balm really works in keeping lips moisturised all day. Apply one layer to keep those lips looking healthy or layer these balms up to create a lipsticks that lasts for hours.
Swatch: CC Skin Tone Correcting Cream in Light, before application
Swatch: CC Skin Tone Correcting Cream in Light, after application
CC Skin Tone Correcting Cream in Light: The first CC Cream I have found that works with Oily skin types - yippee! Since purchasing this product several weeks ago, my foundation has not been worn. A blend of primer, moisturiser and foundation - CC Creams are my new make up must have for Spring/Summer. Not only does this product beautifully even out skin tones, just like it's lip balm pairing, it has an impressive SPF of 20. I apply this CC Cream with my fingers after my daily skincare routine of cleanser and toner, no need for cleaning foundation brushes - woohoo. The miracle makers at L'OCCITANE have created a CC Cream that gives both a mattifying and luminous finish, life complete. Although this product comes in only two shades (lights and medium), they cover a huge range of skin tones so head to your nearest L'OCCITANE to find the one for you.


I could not be more impressed with a new range this Spring, tweet/email me to let me know if you've had the chance to try this range yet and if you're yet to experience the wonders... enjoy the moment, 

Bea-uty Blog
Find me on: TWITTER | BLOGLOVIN' | INSTAGRAM | FACEBOOK 

BEAUTY: BENEFIT, CONTOURING BLOGGER EVENT

Benefit Blogger Event - contouring master class
Contouring - a technique I've never had the confidence to master. However, I have recently had the pleasure of attending a Benefit Blogger Event where I participated in a contouring master class so can now share the wonders of this technique with you all! 

The stages of contouring: Where to highlight and where to contour
The best way to master this technique is to see each stage of contouring on some one else - I managed to snap away whilst Kirstie (Manager at Benefit Bristol) contoured Brooke's (Beauty Consultant at Benefit Bristol) face. There are many diagrams of contouring easily accessible online, but these can often lead to a huge mess of confusion as to where to highlight and where to contour, especially as we all have different face shapes. You should use a concealer that is a shade lighter than your skin tone to highlight the following areas of your face: under your eyes, above your cheekbones, above and between your eyebrows, down the centre of your nose, the middle of your upper lip and the middle of your chin. Once you have done this you can then move on to using a concealer two shades darker to contour the following areas of your face: under your cheek bones (this should start from the centre of your cheek, in line with the pupil of your eye, and work upwards in the direction of your cheek bone towards your hair line) and the sides of your nose.

Tip: Blend, and then blend some more
Once you have completed the application of your contouring you are now ready to blend - soon to become your contouring saviour. You can use either a brush or sponge to blend, personally I feel a sponge makes the process quicker. When you are happy with your blending you are ready to finish the 'extreme' contour look off with a splash of Benefit's Bronzing Powder in Hoola on the contoured areas of your face (this will stop shine and give you a perfect matt finish to your contoured look).

Tip: For a quicker contour try using just 'Hoola' Bronzing Powder 
If you love the sound of contouring but cannot possibly find the time to apply this 'extreme' contour look, we also got to grips with a 'quick and easy' contouring method during the evening. The steps of this contouring technique are similar to those above, but without the coverage of concealer. Simply give your face a base (I chose to use a CC cream as my base as I was not looking for heavy coverage), then apply Benefit's Hoola Bronzing Powder to the following areas of your face: under your cheek bones (this should start from the centre of your cheek, in line with the pupil of your eye, and work upwards in the direction of your cheek bone towards your hair line) and the sides of your nose. This 'quick and easy' look is completed by applying a small amount of blusher (I chose to Benefit's Dandelion Brightening Face Powder) to your cheek bones to give your face that healthy Spring/Summer glow.

Left: Boi-ing Concealer in 01 - light, Right: Boi-ing Concealer in 03 - medium
Contouring has always scared me as I have such a fair skin complexion, anything darker than the lightest shade just shouldn't touch my face surely? However, this is the exact reason contouring is a great technique for fair skin too - I chose to use 01 (Benefit's lightest shade of concealer) and 03 (Benefit's medium shade of concealer) - not everyone has to use the darkest of shades to contour, a common misconception when talking about experimenting with this technique. The swatches above show the colours I used for my skin tone when using the 'extreme' technique for contouring. Although these swatches are both concealer, they are great highlighting and contouring products, for all skin types - hoorah! The most important thing to remember when applying these products is blend, blend until you can blend no more! 


Head to your local Benefit store or concession stand and ask for a contouring demonstration - they'll be happy to help with technique or deciding which shades are best for you. Comment below or tweet me to tell me your favourite contouring technique, 'extreme' or 'quick and easy'. Enjoy showing off your new technique and cheek bones, 

Bea-uty Blog
Find me on: TWITTER | BLOGLOVIN' | INSTAGRAM | FACEBOOK 

BEAUTY: JO MALONE, SPRING FAVOURITE

Spring 2015 Favourite: Peony & Blush Suede
A long time favourite of mine - Jo Malone Peony & Blush Suede Cologne. I know many of us bloggers go on and on about this cologne but there really are many reasons why, the same reasons why I've named it my favourite scent for Spring 2015.


It's unusual for me to find a floral scent I enjoy to wear, many of them I find far too over powering and would feel like a walking potpourri pot if I were ever to wear them for the day. If you too struggle to find a subtle floral scent for Spring, you need to hurry to your nearest Jo Malone and stock up. As well as the perfectly created scents Jo Malone has to offer, the quality of their products mean they last much longer than their rivals. I only ever need 2 sprays of this delightful scent (I choose to spritz my neck area twice) to last me the whole day - incredible! 


The combination of luxury peony and uplifting blush suede is sure to be a favourite of mine for Spring and beyond. A little hint as to what my be my Summer favourite - Jo Malone's new Plum Blossom Cologne (make sure to sample a spritz when you're next in store). Let me know your favourites in the comments and enjoy experiencing your local Jo Malone, 

Bea-uty Blog
Find me on: TWITTER | BLOGLOVIN' | INSTAGRAM | FACEBOOK 

BEAUTY: LUSH, TOP THREE SHAMPOO BARS

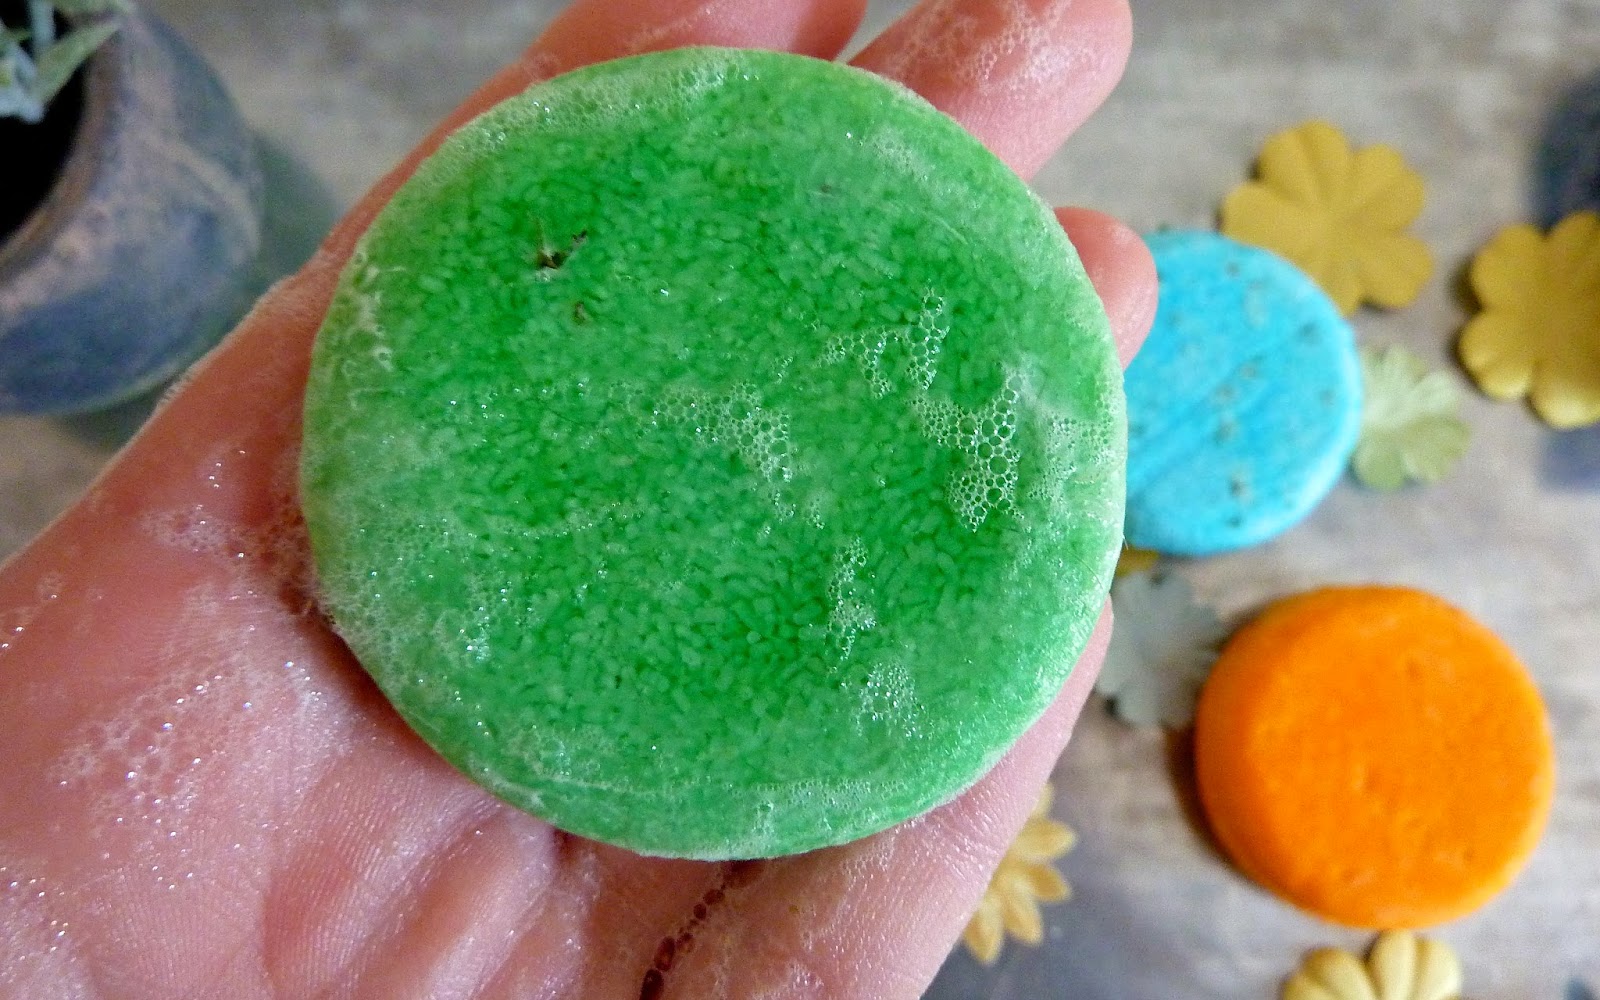
Green Shampoo Bar: Karma Komba, Blue Shampoo Bar: Seanik, Orange Shampoo Bar: Brazilliant
Shampoo bars by LUSH Cosmetics - something we all need to invest in! I have now been using these small bars of shampoo goodness for almost 3 months and I never again want to have to use liquid shampoo from a giant bottle. All 5 bars I have tried and tested (Karma Komba, Seanik, Brazilliant, Jason and the Argan Oil and Montalbano) have left my hair feeling squeaky clean, quite literally - that super fresh, super clean just-washed-my-hair-in-natural-springs feeling you get from only natural products just like these.


Karma Komba: The 'I would be happy to constantly smell my hair today' bar. This bar is the most scented of the bars I have tried and tested, so far. The blend of lemongrass, orange, lavandin, pine and patchouli create a lovely up-lifting spring/summer scent for your wonderful locks. If you're looking for perfect shine and scent from your daily shampoo - this one is for you!


Seanik: The 'I've spent all day on the beach and yes, my hair still looks this good' bar. It's blend of seaweed, sea-salt and lemon make it the perfect bar to pop in your bag during the summer months to rescue that dried out hair! The fresh scent of lemon works great with the fantastic combination of ingredients to give your hair shine and volume. Hair that's lacking life from the battering of sun, sand, sunscreen and sea-water? This bar will save the day for you!


Brazilliant: The 'Go on, ask me how my hair looks this healthy 6 weeks after a cut' bar. The blend of oranges, andiroba oil, ylang ylang oil and a bunch of other fantastic nutrients will give your hair that rescue it's crying out for when it really needs a trim. I found this bar works best for the curl in my hair, I saw a definite reduction of frizz - a miracle? Maybe. If you've been 'gifted' with curly locks and are fed up of anti frizz products weighing your hair down - purchasing this bar will feel like a weight off your shoulders (literally)!

Tip: Lather the bar in your hand before applying to you hair.
All these bars lather up much better than liquid shampoo - meaning they last a lot longer and spread much further in your hair, perfect if you're a longer lock lady! I often lather the bar up in my hand before briefly rubbing the bar directly on to my hair (you don't even have to put it directly on to your hair, I just prefer doing this to ensure a thorough cleanse).

So, not only do these beautiful bars have no negatives (in my opinion), they are so much smaller and a lot less hassle than huge shampoo bottles. Even better, with summer coming up, they are the perfect size for taking on holiday and they'll leave you enough weight in your suitcase to pack another pair of shoes AND another summer dress - hoorah! LUSH have even provided us a perfectly sized travel tin which you can purchase here.


Head down to your nearest LUSH (or find them online at www.lush.co.uk) and pick yourself a bar to try. Let me know which are your favourites in the comments - enjoy, 

Bea-uty Blog
Find me on: TWITTER | BLOGLOVIN' | INSTAGRAM | FACEBOOK 
NEW
Powered by Blogger.